Event property configuration
Once an event has been configured, you can start configuring the properties of the event. Select one of the properties in the asset tree that has not been configured yet.

Next, select either historian , external database or manual detection mode.

You can optionally set a priority, this determines in which order the properties are evaluated. Priorities with a lower number will be evaluated before priorities with a higher number.
The rest of the configuration depends on the selected detection mode.
Detection mode
Detection mode: Historian
The historian detection mode works by getting the
aggregated
value of a data reference for the time period of the event. An event property is either simple or periodic. A simple event property will return a single aggregated value a periodic one will return a list of periodically aggregated values. For periodic event properties you will additionally need to define an Interval.

Priority
The priority determines the order in which properties are evaluated within the same event. Properties with a lower priority number are evaluated before those with a higher priority number. To ensure that ‘priority’ works effectively with ‘close after’, set an equal or longer ‘close after’ period for properties with a higher priority number. Note that priority only affects the order of execution for open properties: a property with a higher priority number can retrieve a value earlier and close before a property with a lower priority number.
Start/stop offset
Will apply an offset on the start/stop time of the event when getting the value(s) for this property.
Close after
The “close after” period refers to the additional time allowed beyond the event stop time during which the event processor will continue attempting to retrieve a value if none is found. This is useful in cases where the data may be delayed or not immediately available.
Default value
Default value that is used if there is no data available.
Preview
To be able to see the properties for an ongoing event you can enable a preview for an event property. This will periodically update the property before getting finalized when the event closes.
Good points only
By default, only points with a status of Good will be used, this option can be disabled to include points without a status or a Bad status.
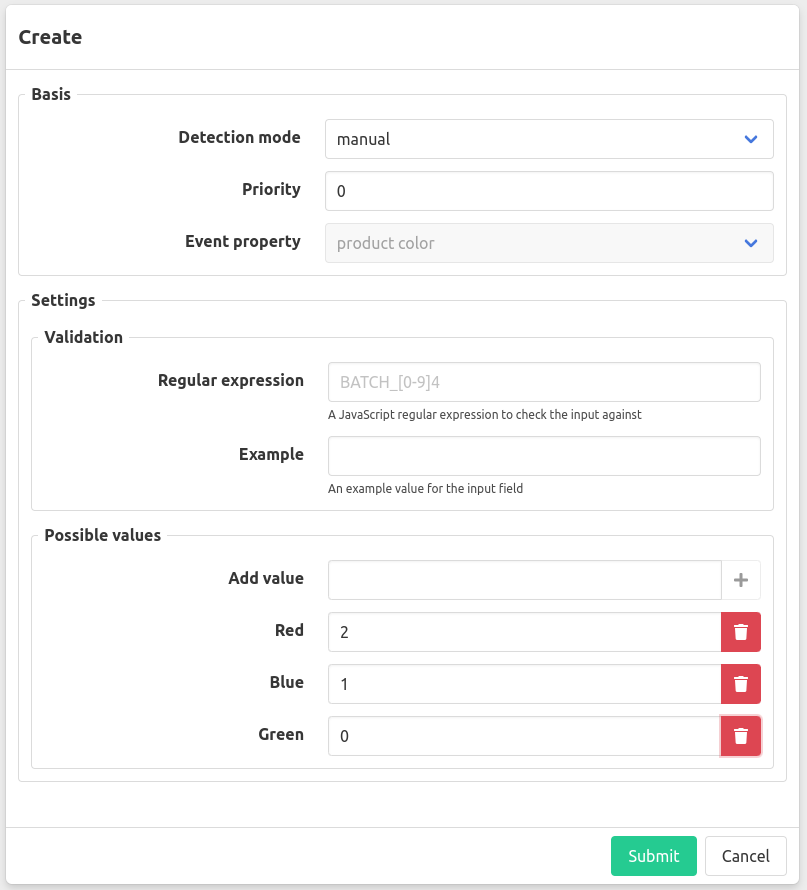
Detection mode: Manual
When selecting the manual detection mode, the event property will be completed by manual entry. You can optionally configure a list of predefined values in the section Possible values under settings. This offers the possibility of mapping certain values to a more human friendly display name in the manual entry form. To add such a mapping enter the “friendly” name of the value in the input field Add value and click + icon next to it. Then enter the value that should be stored in the database. Below we have an example configuration where we map a number property color to their corresponding colors.
If the datatype of the event property is a string, you can also configure validation for manual entry. This can be done by entering a regular expression in the Validation field. If the entered value does not match the regular expression, the manual entry form will show an error message.
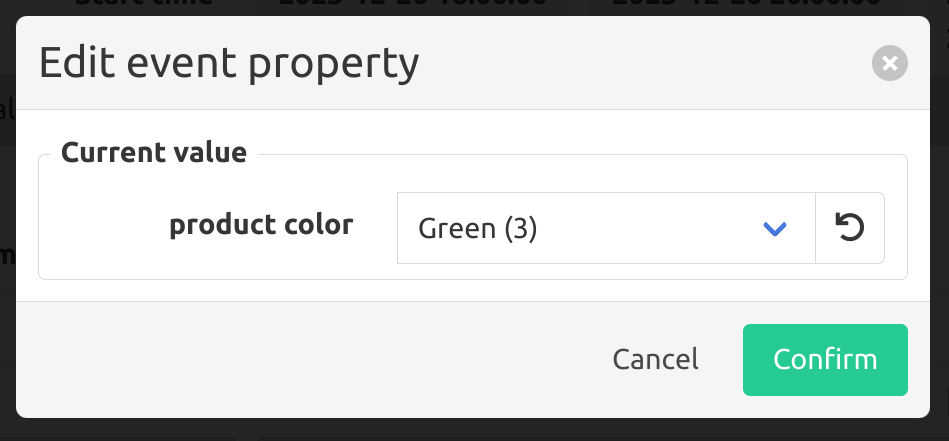
And this is how it would look for a user filling in this property in the manual entry form.
Detection Mode: Historian Advanced
The Historian Advanced detection mode provides advanced capabilities for realigning and resampling data based on an additional measurement dimension (for example, a spatial coordinate or process parameter). This mode is particularly useful when sensors are positioned in different locations or capture measurements from varied perspectives. As a result, at any given timestamp, each sensor might record data corresponding to different points along a common dimension. Using this mode, you can align the data to a unified reference and resample the measurements at consistent intervals along that dimension (e.g., every 10 cm).
Example scenario
Imagine an extrusion process with the following measurements:
-
Length Measurement:
- Source: A metering device at position 0 m on the extrusion line.
- Timeseries:
extruder_1\metering\length - Frequency: Every second.
-
Thickness Measurement:
- Source: A sensor located at 1.2 m from the start.
- Timeseries:
extruder_1\thickness - Sampling Rate: Every 10 seconds.
- Associated Dimension: A measurement indicating the sensor’s perceived length, available as
extruder_1\thickness\length.
-
Cut Event:
- Measurement:
extruder_1\metering\cut - Role: Defines the start and stop of the extrusion event.
- Measurement:
Using Historian Advanced, you can align the thickness measurement with the length measurement and resample it at intervals (e.g., every 10 cm).
Configuration Walkthrough
Before starting, ensure you have already created:
- An event type Extrusion with a property
Lengthrepresenting the extruded product’s length. - An event configuration for asset
extruder_1that uses theextruder_1\metering\cutmeasurement to define event boundaries.
Follow these steps to configure an event property that captures the thickness at every 10 cm along the extrusion:
-
Select Event Type:
- Navigate to Events → Event types.
- Choose the event type Extrusion.
-
Add a New Property:
- Click Add property.
- Name the property (e.g.,
Thickness by length). - Set the property Type to
periodic_with_dimension.
-
Configure the Asset:
- Go to Assets and select asset
extruder_1. - For the new property, choose the detection mode historian_advanced.
- Go to Assets and select asset
-
Define the Input Timeseries:
- Measurement:
extruder_1\thickness - Aggregation:
mean - Interval: 1 second
(This input will be realigned and resampled.)
- Measurement:
-
Define the Reference (Dimension) Timeseries:
- Measurement:
extruder_1\thickness\length
(This timeseries represents the dimension along which the input data will be resampled.)
- Measurement:
-
Set Resample Interval:
- Enter a Dimension resample interval of
0.1(representing 10 cm).
- Enter a Dimension resample interval of
-
Enable Realignment:
- Activate the Realign on dimension option.
-
Choose a Realign Strategy:
- Select the start strategy to ensure that the first resampled thickness value corresponds with the first value of the length measurement.
- Specify the Offset source as
extruder_1\metering\length.
(This setting ensures that the thickness data aligns with the reference length measurement.)
Detailed Explanations
Dimension data reference
The dimension data reference is a simple timeseries that defines the measurement dimension (e.g., length). Its values must be monotonically increasing or decreasing during the event. This reference is used to both resample and realign the input data. This measurement represents the dimension seen in the perspective of the input data. For example, if the input data is a thickness measurement, the dimension data reference could be the length of the extruded product as seen from the thickness sensor.
Resample by dimension
The resample by dimension option allows you to resample the input timeseries at specified intervals along the dimension timeseries. The interval is set in the dimension resample interval field. The resulting periodic property will have a value for each interval (e.g., every 10 cm). For input timeseries with numerical data, the resampled value will be linearly interpolated between the two nearest values. For input timeseries with string or boolean data, the resampled value will be the closest value from the input timeseries.
Realign on dimension
This option shifts the timestamps of the captured data so that they correspond to the reference timeseries’ domain. For example, if the dimension timeseries represents the length of an extruded product, the realigned data will match the positions indicated by that length measurement.
Realign Strategy
Overview
Use the realign strategy to synchronize data based on a dimension timeseries. The strategy locates timestamps by finding the dimension value closest to (and not exceeding) a reference, then anchors the data to either the start or stop of the event. The total duration remains limited by the event’s overall start and stop times.
| Strategy | When to Use | How It Works |
|---|---|---|
| Start | If you need the first data point to align with a specific dimension value. Example: The dimension is 0 m at the start, but your sensor reads –1.2 m at that actual start. | Historian finds the timestamp of the dimension value ≤ the desired reference. That becomes the start point, capturing data until the event ends. |
| Stop | If you want the final data point to match a certain dimension value. Example: The dimension timeseries ends at 10 m, but the sensor runs up to 11.2 m. | Historian finds the timestamp of the dimension value ≤ the desired reference. That becomes the end point, capturing data from the event start up to this stop point. |
Examples
-
Start strategy:
Ifextruder_1\lengthspans 0 m to 10 m, andextruder_1\thickness\lengthspans –1.2 m to 8.8 m, selecting start ensures 0 m in the sensor timeseries aligns with the event’s start. -
Stop strategy:
Ifextruder_1\lengthspans 0 m to 10 m, butextruder_1\width\lengthspans 1.2 m to 11.2 m, selecting stop ensures 10 m in the sensor timeseries aligns with the event’s end.
Offset source
The offset source configuration determines which data is used to realign your timeseries data based on the dimension timeseries. It can be configured as either:
- A simple timeseries that represents the dimension values of that event (e.g., a length measurement for the event), or
- A simple property of the event that has the value of the start or end dimension value.
Key Requirements:
- The offset source must be numeric; it should either be a numeric timeseries or a simple property with a number datatype.
Example:
If using the start strategy, the offset source could be the length measurement of the extruded product (extruder_1\length) or a simple property of the event that represents the start position of the extruded product.
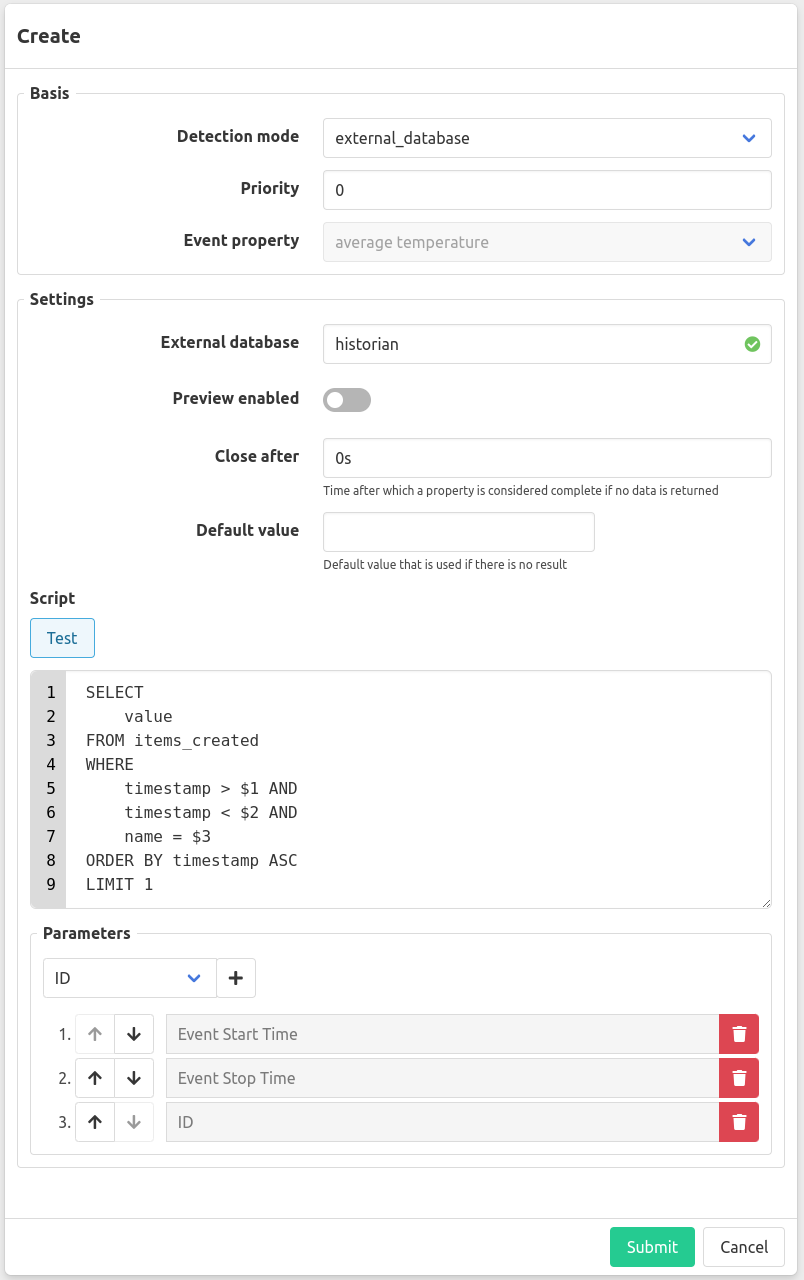
Detection mode: External database
The External database detection mode works by querying the external database for either a single value if the event property is periodic or a series of rows containing a timestamp in the first column and a value in the second column. You can add query parameters in the options to constrain the data being returned. The query parameters can consist of the start or end time time of the event or the value of another simple property for that event. For simple properties we also support the Preview Enabled option. In cases where the query may occasionally yield no data, you have the option to specify a ‘Default Value’ to be applied in such instances.
Given the following database table and configuration:
items_created:
| name | time | value |
|---|---|---|
| Batch1 | 2023-09-01 00:01 | 15 |
| Batch2 | 2023-09-01 00:01 | 20 |
| Batch1 | 2023-09-02 00:01 | 6 |
configuration
The result for an event with start time 2023-09-01 00:00:00 and stop time 2023-09-01 03:00:00 with batch_id = Batch1 would be 15 and the executed query would have been SELECT value FROM items_created WHERE time > '2023-09-01 00:00:00' and time < '2023-09-01 03:00:00 with' AND name = 'Batch1'.
And example table and query (script) for a periodic property would be:
ph_samples
| name | time | ph_sample |
|---|---|---|
| Batch1 | 2023-09-01 00:20 | 4 |
| Batch2 | 2023-09-01 00:20 | 5 |
| Batch1 | 2023-09-01 01:00 | 6 |
| Batch2 | 2023-09-01 01:00 | 3 |
| Batch1 | 2023-09-01 01:20 | 7 |
| Batch2 | 2023-09-01 01:20 | 7 |
| Batch1 | 2023-09-02 01:01 | 8 |
| Batch2 | 2023-09-02 01:01 | 4 |
Script (query with parameters):
SELECT time, ph_sample FROM ph_samples WHERE time > '2023-09-01 00:00:00' and time < '2023-09-01 03:00:00 with' AND name = 'Batch1'
Would result in a periodic value for the previously mentions timestamp of:
| offset (in seconds) | value |
|---|---|
| 1200 | 4 |
| 3600 | 6 |
| 4800 | 7 |
Re-evaluation of event properties
By selecting an event property configuration and pressing the re-evaluate button in the top right corner, all event properties for that event property configuration will be re-evaluated for the chosen time period.